


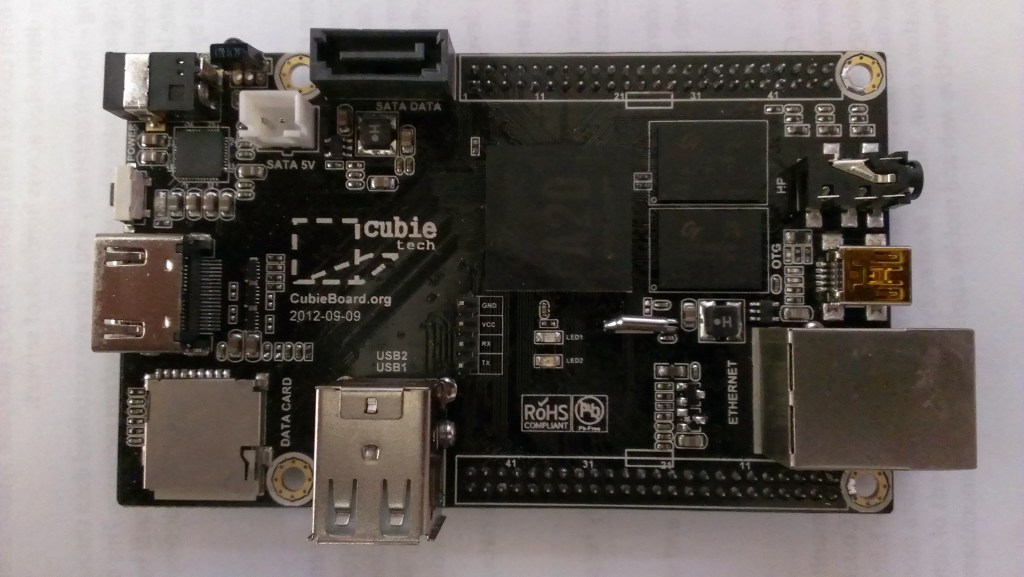
Cubieboard2 with ARM AllWinner Processor - A20 finally arrived. Pretty excited about building my ARM Linux embedded system.
Learn more about Cubieboard here

Posted by Venkatt Guhesan on November 3, 2013
Cubieboard2 with ARM AllWinner Processor - A20 finally arrived. Pretty excited about building my ARM Linux embedded system.
Learn more about Cubieboard here
Posted in CubieBoard2 & CubieTruck, Embedded Systems, Linux, Technology | Tagged: Cubieboard2, Embedded Linux, Linux | Leave a Comment »
Posted by Venkatt Guhesan on June 24, 2013
Recently I decided to port some of my development using ZeroMQ onto my CentOS development machine and I ran into some challenges. I’m documenting those challenges so that if someone else runs into the same pitfalls I did, they can avoid it.
In this example today, we will work with the first “HelloWorld” examples in the ZeroMQ guide found here. I added a few modifications to the sample such as a package name and a try-catch around the Thread and an exception.tostring() to display any stack-trace.
Source code for src/zmq/hwserver.java
package zmq;
import java.io.PrintWriter;
import java.io.StringWriter;
import org.zeromq.ZMQ;
//
// Hello World server in Java
// Binds REP socket to tcp://*:5555
// Expects "Hello" from client, replies with "World"
//
public class hwserver {
	/**
	 * @param args
	 */
	public static void main(String[] args) {
		ZMQ.Context context = ZMQ.context(1);
		// Socket to talk to clients
		ZMQ.Socket socket = context.socket(ZMQ.REP);
		socket.bind ("tcp://*:5555");
		try {
			while (!Thread.currentThread ().isInterrupted ()) {
				byte[] reply = socket.recv(0);
				System.out.println("Received Hello");
				String request = "World" ;
				socket.send(request.getBytes (), 0);
				Thread.sleep(1000); // Do some 'work'
			}
		} catch(Exception e) {
			StringWriter sw = new StringWriter();
			PrintWriter pw = new PrintWriter(sw);
			e.printStackTrace(pw);
			System.out.println(sw.toString());
		}
		socket.close();
		context.term();
	}
}
Similarly, source code for the client, src/zmq/hwclient.java
package zmq;
import org.zeromq.ZMQ;
public class hwclient {
	/**
	 * @param args
	 */
	public static void main(String[] args) {
		ZMQ.Context context = ZMQ.context(1);
		// Socket to talk to server
		System.out.println("Connecting to hello world server");
		ZMQ.Socket socket = context.socket(ZMQ.REQ);
		socket.connect ("tcp://localhost:5555");
		for(int requestNbr = 0; requestNbr != 10; requestNbr++) {
			String request = "Hello" ;
			System.out.println("Sending Hello " + requestNbr );
			socket.send(request.getBytes (), 0);
			byte[] reply = socket.recv(0);
			System.out.println("Received " + new String (reply) + " " + requestNbr);
		}
		socket.close();
		context.term();
	}
}
Now that you have the sample code, how do you compile using the ZeroMQ?
Assumption: You have installed Java (1.7 or above)
Step-1: Installing ZeroMQ onto CentOS [Following steps are performed under root account]
Step-2: Installing a Language Binding for Java. In this case, we will use JZMQ from https://github.com/zeromq/jzmq
./autogen.sh
./configure
make
make install
# JAR is located here: /usr/local/share/java/zmq.jar
# .so link files are located here: /usr/local/lib
include ld.so.conf.d/*.conf
/usr/local/lib
Step-3: Compile and run the Java examples above.
cd ~/dev/zeromq/example/
# Compile hwserver.java
javac -classpath  /usr/local/share/java/zmq.jar ./zmq/hwserver.java
# Compile hwclient.java
javac -classpath  /usr/local/share/java/zmq.jar ./zmq/hwclient.java
# Run hwserver in a separate prompt
java -classpath .: /usr/local/share/java/zmq.jar -Djava.library.path=/usr/local/lib zmq.hwserver
# Run hwclient in a seperate prompt
java -classpath .:/usr/local/share/java/zmq.jar -Djava.library.path=/usr/local/lib zmq.hwclient
Output on the hwserver console:
Received Hello
Received Hello
Received Hello
Received Hello
Received Hello
Received Hello
Received Hello
Received Hello
Received Hello
Received Hello
output on the hwclient console:
Connecting to hello world server
Sending Hello 0
Received World 0
Sending Hello 1
Received World 1
Sending Hello 2
Received World 2
Sending Hello 3
Received World 3
Sending Hello 4
Received World 4
Sending Hello 5
Received World 5
Sending Hello 6
Received World 6
Sending Hello 7
Received World 7
Sending Hello 8
Received World 8
Sending Hello 9
Received World 9
Few interesting points to note are as follows:
(Excerpt from the ZeroMQ website!)
ØMQ (also seen as ZeroMQ, 0MQ, zmq) looks like an embeddable networking library but acts like a concurrency framework. It gives you sockets that carry atomic messages across various transports like in-process, inter-process, TCP, and multicast. You can connect sockets N-to-N with patterns like fanout, pub-sub, task distribution, and request-reply. It’s fast enough to be the fabric for clustered products. Its asynchronous I/O model gives you scalable multicore applications, built as asynchronous message-processing tasks. It has a score of language APIs and runs on most operating systems. ØMQ is from iMatix and is LGPLv3 open source.
If you find this article useful, please subscribe to my blog and/or share my link with others.
Posted in Java, ZeroMQ | Tagged: CentOS, client-server, example, jzmq, Linux, zeromq | 1 Comment »
Posted by Venkatt Guhesan on November 14, 2012
Sometimes you want an easy way to simulate load on a file-system that you are trying to test. Here’s a quick and easy way.
Suppose your mount point you want to perform this IO is “/myspecialmount”. (Assuming you have plenty of space to test)
Then the easiest way to load some IO is through the following bash-script:
#!/bin/bash
while true
do
  echo "=== Starting clean-up ===="
  rm -fr /myspecialmount/usr
  echo "=== Starting load ===="
  rsync -avp /usr /myspecialmount
done
In the above code sample, Line-6 - cleans up the filesystem sub-folder “/myspecialmount/usr”. The options “-fr” allows you to perform the clean-up recursively with a force option. And in Line-8, we synchronize the systems “/usr” folder and files onto “/myspecialmount/usr”. And these two steps are done on an infinite-loop.
Please note that this is not a true load-testing where you have parallel-simultaneous IO requests being sent to a filesystem but rather a simple way to create some load.
There are some specialized tools such as “iozone“, “bonnie” and “dbench” and others (see Filesystems section) that are sophisticated bench-marking tools available to the Linux community.
If you find this article useful, please subscribe to my blog and/or share my link with others.
Posted in Linux | Tagged: benchmark, create load, Filesystem, IO, Linux, load-testing, test IO | Leave a Comment »
Posted by Venkatt Guhesan on April 20, 2012
If you are an avid Python developer, you may all be excited about the new features available in the Pycharm 2.5 release, especially the remote interpreters, virtualenv and setup.py support. You can read more about the new exciting features here.
But as I started to tinker with the “remote interpreter” feature - I stumbled upon some challenges and I thought I’d document them for other PyCharm users who might benefit from this blog entry.
Let’s get right into the issue:
I have a Windows 7 host where I do most of my development. I develop software for a Linux based system and most of the Python libraries that I need to work from third-party vendors are only available for Linux. And so my PyCharm IDE runs on Windows and I have a VirtualBox instance of CentOS linux running within my host machine accessible via a Virtual Box - Bridged Adapter. This Linux could also be running in a separate physical host accessible via TCP-IP. Now that we have a good idea about my development environment, let’s go over why I want to use the “remote interpreters” feature.
This feature allows you to connect with a Python environment and all’s of it’s SITE_PACKAGES available on the remote machine as if you were running it locally on your native PC. Furthermore, you can perform step-through of your code right from your development platform as if you ran the IDE right within the Linux machine. (Please note that this feature can then lend itself to running the Linux server as a terminal without a GUI/Windows Manager like KDE/Gnome). This will simplify your footprint on the server side.
When you run the interpreter, you will run into issues such as “No such file or directory.” That’s because when you execute a file natively in Windows under c:\temp\abc.py - the “remote interpreter” is now looking for a file under that same path in the remote server under Linux. To avoid this issue, here’s the solution I have engaged.
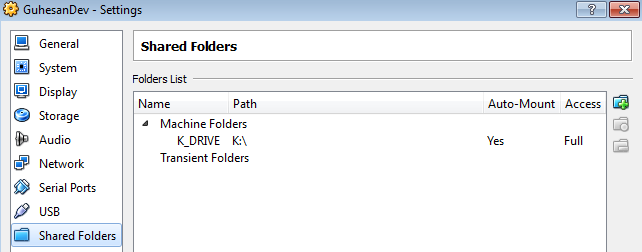
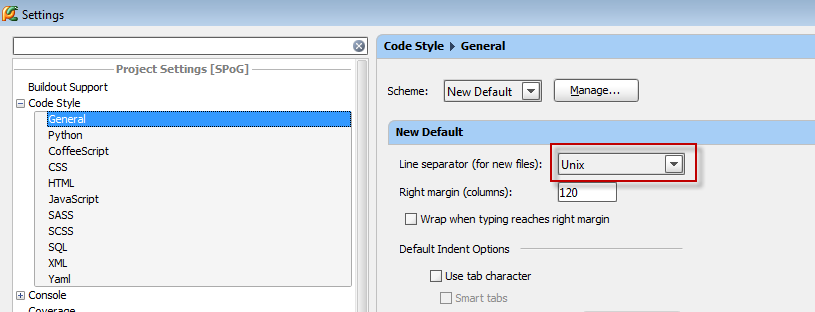
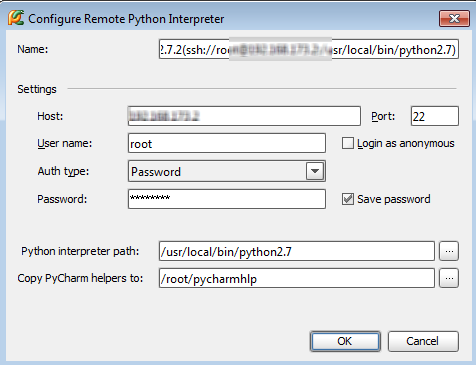
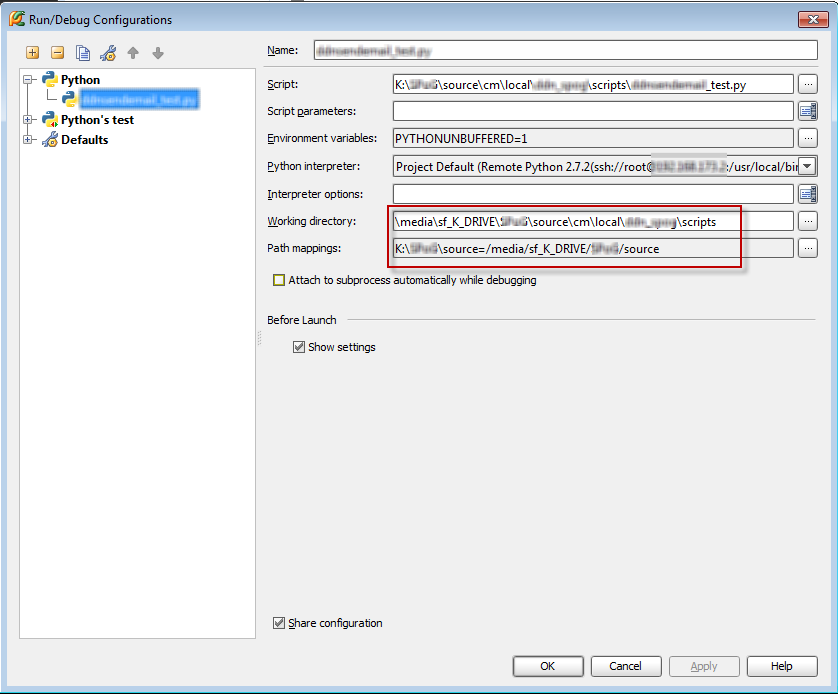
That should get the job done.
Update on May 18th, 2012
#This shows you an example of how you would invoke a Python UnitTest via remote-interpreter to another script located in the same folder.
#Invoked from sendfoo_test.py
scriptName = "sendfoo.py"
# BASE_PATH is the absolute path of ../.. relative to this script location
BASE_PATH = reduce(lambda l,r: l + os.path.sep + r, os.path.dirname( os.path.realpath( __file__ ) ).split( os.path.sep ) )
#print BASE_PATH
# add ../../scripts (relative to the file (!) and not to the CWD)
NEWSCRIPTPATH = os.path.join( BASE_PATH, scriptName )
#print NEWSCRIPTPATH
#Further down in code…
p1 = os.popen("%s" % self.NEWSCRIPTPATH, "w")
p1.close()
For early Pythons…
#If you are using Python 2.6.6 (not Python 2.7+)
scriptLocation = "sendfoo.py"
scriptLocation = os.path.join( os.path.dirname( os.path.realpath( __file__ ) ), scriptLocation )
print scriptLocation
#Further down in code…
p1 = os.popen("%s" % self.NEWSCRIPTPATH, "w")
p1.close()
Posted in Programming, PyCharm, Python, Technology | Tagged: CentOS, enterprise-it, IDE, Linux, PyCharm, Python, remote interpreter, remote interpreters, software, technology, Virtual Box, VirtualBox, Windows | 6 Comments »
