MyThinkPond

On Java, Python, Groovy, Grails, Spring, Node.js, Linux, Arduino, ARM, Embedded Devices & Web

Posts Tagged ‘Python’

Python pycharm - configuring remote interpreters from Windows to Linux

Posted by Venkatt Guhesan on April 20, 2012

If you are an avid Python developer, you may all be excited about the new features available in the Pycharm 2.5 release, especially the remote interpreters, virtualenv and setup.py support. You can read more about the new exciting features here.

But as I started to tinker with the “remote interpreter” feature - I stumbled upon some challenges and I thought I’d document them for other PyCharm users who might benefit from this blog entry.

Let’s get right into the issue:

My Setup:

I have a Windows 7 host where I do most of my development. I develop software for a Linux based system and most of the Python libraries that I need to work from third-party vendors are only available for Linux. And so my PyCharm IDE runs on Windows and I have a VirtualBox instance of CentOS linux running within my host machine accessible via a Virtual Box - Bridged Adapter. This Linux could also be running in a separate physical host accessible via TCP-IP. Now that we have a good idea about my development environment, let’s go over why I want to use the “remote interpreters” feature.

Remote Interpreters

This feature allows you to connect with a Python environment and all’s of it’s SITE_PACKAGES available on the remote machine as if you were running it locally on your native PC. Furthermore, you can perform step-through of your code right from your development platform as if you ran the IDE right within the Linux machine. (Please note that this feature can then lend itself to running the Linux server as a terminal without a GUI/Windows Manager like KDE/Gnome). This will simplify your footprint on the server side.

Challenges

When you run the interpreter, you will run into issues such as “No such file or directory.” That’s because when you execute a file natively in Windows under c:\temp\abc.py - the “remote interpreter” is now looking for a file under that same path in the remote server under Linux. To avoid this issue, here’s the solution I have engaged.

  1. Share my c:\projects\MyProject to myself so that I can map a new drive under Windows such as “K:\MyProjects”.
  2. Shared a “Machine Folder” to my Virtual machine. If you have a remote host, then either setup a GIT push scheme or a SFTP from your Windows to this remote server. See image below for illustration.
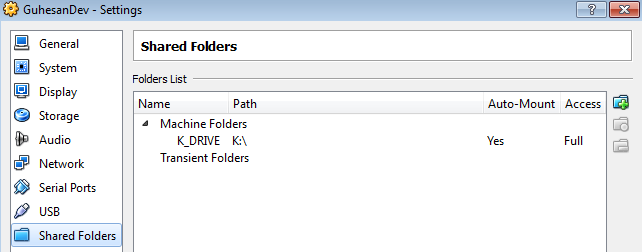
    Virtual Box - Machine Target
  3. At this time, My “c:\projects” folder is shared to the Linux environment as “/media/sf_K_DRIVE/” and “auto-mounted”. (I have also added my user-id to the “vboxsf” group because of permissions. But that’s another blog…)
  4. Now every modification of my Python files in my “K:\MyProject”, is exactly the same on the Linux virtual-box.
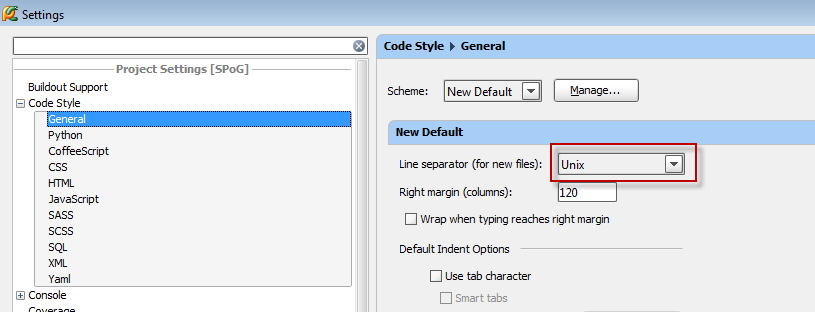
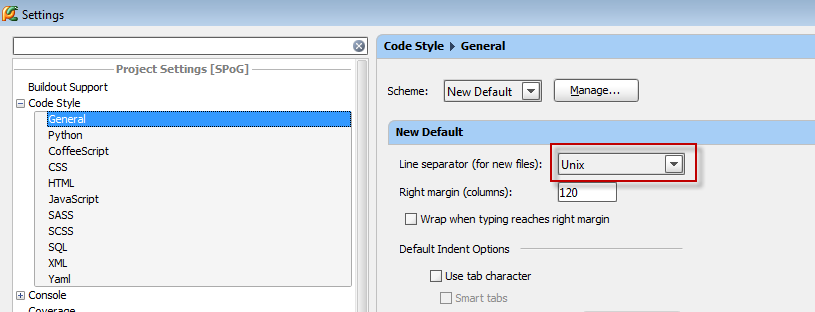
  5. The first setting to change is the “Line Seperator” (unless you want to execute Dos2Unix each time you run the file on Linux). This can be done under “Code Style” in PyCharm Settings. See image below:PyCharm Settings Line Seperator
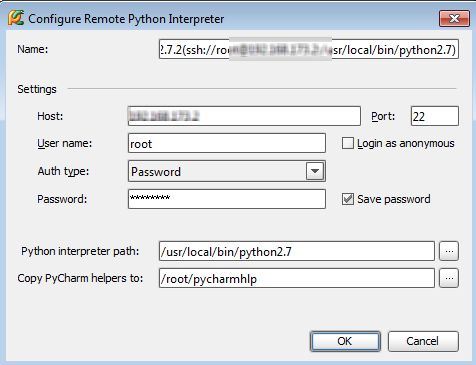
  6. Next, configure the “Remote Python Interpreter”. See screenshot below:PyCharm - Configure Remote Interpreter
  7. In the previous step, when you choose a path on the Linux server for the “PyCharm helpers”, PyCharm pushes via SSH a set of libraries and software that helps with the remote debugging and scaffolding.
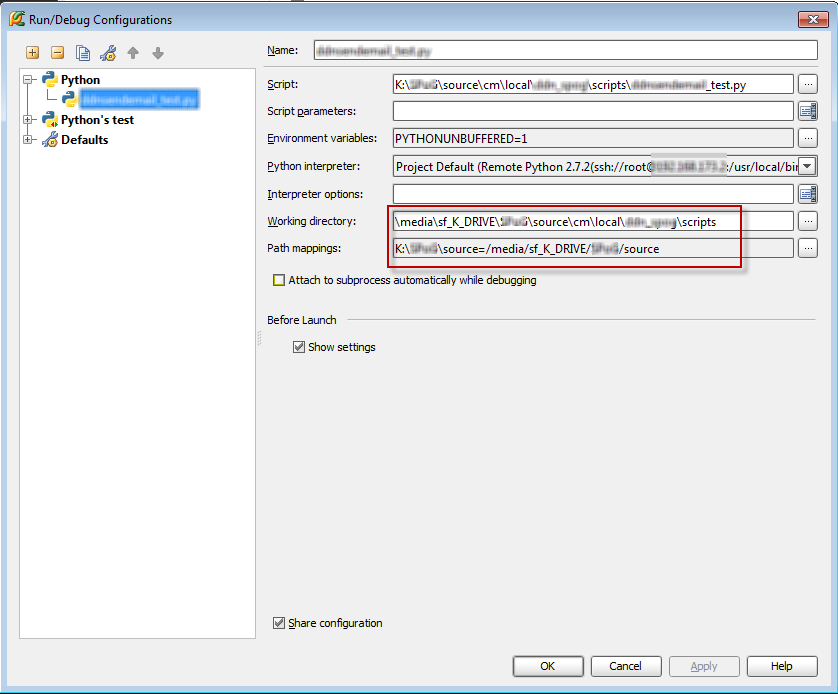
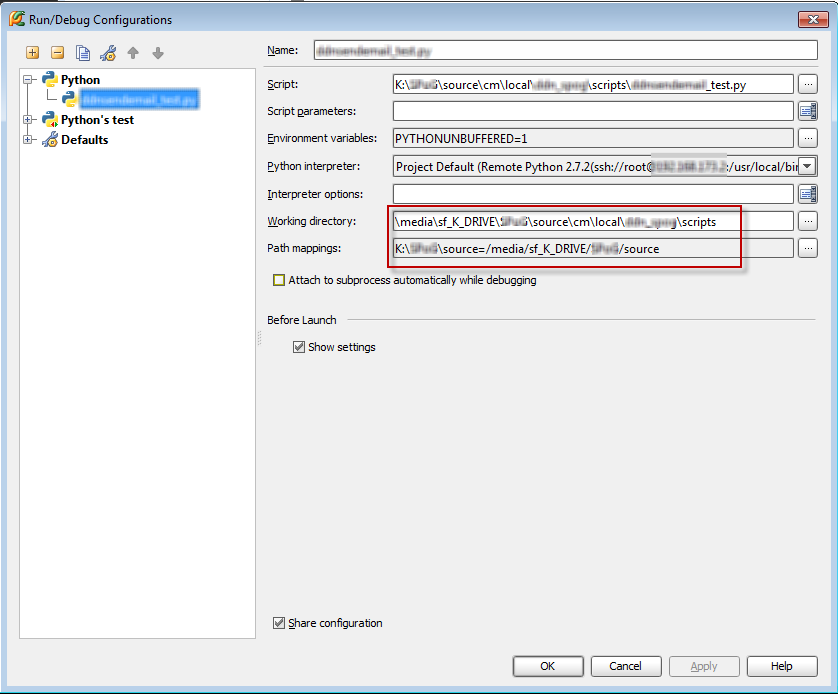
  8. The next step is to Run (or Debug) your code. See the screenshot below that shows the details of the “Run/Debug Configuration” screen. The important parts are “Working Directory” and “Path Mappings”. This is the trick that allows you to map your Windows Path to an equivalent Linux Path.PyCharm - Run/Debug Configuration Screen
  9. Now run (or debug) away your code as if it was running locally on your native Windows development platform.
That should get the job done.

Update on May 18th, 2012

#This shows you an example of how you would invoke a Python UnitTest via remote-interpreter to another script located in the same folder.

#Invoked from sendfoo_test.py
scriptName = "sendfoo.py"
# BASE_PATH is the absolute path of ../.. relative to this script location
BASE_PATH = reduce(lambda l,r: l + os.path.sep + r, os.path.dirname( os.path.realpath( __file__ ) ).split( os.path.sep ) )
#print BASE_PATH
# add ../../scripts (relative to the file (!) and not to the CWD)
NEWSCRIPTPATH = os.path.join( BASE_PATH, scriptName )
#print NEWSCRIPTPATH
#Further down in code…
p1 = os.popen("%s" % self.NEWSCRIPTPATH, "w")
p1.close()

For early Pythons…

#If you are using Python 2.6.6 (not Python 2.7+)
scriptLocation = "sendfoo.py"
scriptLocation = os.path.join( os.path.dirname( os.path.realpath( __file__ ) ), scriptLocation )
print scriptLocation
#Further down in code…
p1 = os.popen("%s" % self.NEWSCRIPTPATH, "w")
p1.close()

Posted in Programming, PyCharm, Python, Technology | Tagged: , , , , , , , , , , , , | 6 Comments »

Configure static resources in Django - Python

Posted by Venkatt Guhesan on March 1, 2012

Working on a Django project, one of the first things that one would encounter is configuring Django for static resources such as “css”, “images”, “jpeg” and “js”. In looking at the “StaticResources” link that’s part of the Django documentation, it’s a bit cryptic for someone who’s starting out in Django and Python. So here’s a step-by-step on two ways to configure your static-resources in a Django project.

This method is described in the Django documentation and is probably the preferred approach.

1. Edit “settings.py” under your Django project and define the following variables:

STATIC_ROOT = ''
STATIC_URL = '/s/'
STATICFILES_DIRS = (
    'C://Projects//mydjangoproject//static//',
)

2. Edit “urls.py” and add the following:

from spog import settings
...
if settings.DEBUG:
    urlpatterns += patterns('',
        (r'^s/(?P<path>.*)$', 'django.views.static.serve',
           {'document_root': settings.STATIC_ROOT}),
    )

Notice the extra comma at the end. That’s very important!

3. Edit your html file, in this example index.html

<link rel="stylesheet" type="text/css" href="/s/css/grid960.css"/>

4. Copy your resources to “C:\Projects\mydjangoproject\static\css\grid960.css”.

5. python manage.py runserver 8080

6. Open browser and visit “http://localhost:8080/%5BYOUR_PAGE%5D&#8221;.

If you notice the step-2 syntax, it is wrapped inside a “if settings.DEBUG” if-block. This variable will be false when you deploy to a production environment where you may have something like an Apache Web server serving all your static resources. So when you move to production, you can push all your static resources to be outside the project.

Posted in Django, Python | Tagged: , , , , | Leave a Comment »

How to upgrade to Python 2.7 on CentOS

Posted by Venkatt Guhesan on December 28, 2011

If you tried upgrading to Python 2.7 on CentOS, you will quickly find out that the RPM’s don’t exist for this in the repos. So here’s a short summary of what I did to upgrade my Python to 2.7 on CentOS.

Based on a few Google searches… I discovered that a few dependent packages are required before you try upgrading to Python 2.7.

yum -y groupinstall 'Development Tools'
yum -y install openssl-devel* ncurses-devel* zlib*.x86_64</pre>
yum -y install bzip2 bzip2-devel bzip2-libs

Next download the latest tar/gzip/tgz available here:
http://python.org/ftp/python/2.7/

#Download the latest available at this time
curl -O http://python.org/ftp/python/2.7/Python-2.7.tgz
#Unzip/expand file
tar xfz Python-2.7.tgz
#Change Directory to the unzipped folder
cd Python-2.7
#read README file or you can follow the lines below
./configure
#you could also run configure with threads and shared enabled
#./configure --prefix=/opt/python2.7 --with-threads --enable-shared
#Compile
make
#Install
make install
# Exit from your shell and open a new shell/SSH session
# Use the command below to display which path of python is currently active
which python
#To verify if the install succeeded
python -V
#Use UPPERCASE 'V' - not lower-case.
#Output will be "Python 2.7"
#Sometimes you may need to exit out of your shell
#and them come back in to see the version changes.
#So best exit your current shell prompt and reopen
#a new before checking the version.

You’re all set. You’ve just upgraded to Python 2.7.

The next logical step that you need to perform is to install the setup tools that allows you to install modules. (Please note that setuptools is not available for Python 3.0+, instead use Distrubute available here - http://pypi.python.org/pypi/distribute)

Download the latest setuptools for your version of Python (2.7 in this case) from here:
http://pypi.python.org/pypi/setuptools#downloads

curl -O http://pypi.python.org/packages/2.7/s/setuptools/setuptools-0.6c11-py2.7.egg
chmod 775 setuptools-0.6c11-py2.7.egg
sh setuptools-0.6c11-py2.7.egg
#This should install the egg here: /usr/local/lib/python2.7/site-packages/

Next you want to install “PIP”, this enables the download and install of modules in Python:

$ curl -O http://pypi.python.org/packages/source/p/pip/pip-1.0.tar.gz
$ tar xvfz pip-1.0.tar.gz
$ cd pip-1.0
$ python setup.py install # may need to be root</pre>

Now you’re all set. Suppose you wanted to install a module called ‘simplejson’.

You can now do this using command syntax like this:

pip install simplejson

Cheers.

Posted in Python | Tagged: , , , | 10 Comments »

 
Follow

Get every new post delivered to your Inbox.

Join 152 other followers