MyThinkPond

On Java, Python, Groovy, Grails, Spring, Node.js, Linux, Arduino, ARM, Embedded Devices & Web

Archive for the ‘Programming’ Category

contains information related to programming that’s not Java based but others. Since Java is my language at work with at this present time.

Python pycharm - configuring remote interpreters from Windows to Linux

Posted by Venkatt Guhesan on April 20, 2012

If you are an avid Python developer, you may all be excited about the new features available in the Pycharm 2.5 release, especially the remote interpreters, virtualenv and setup.py support. You can read more about the new exciting features here.

But as I started to tinker with the “remote interpreter” feature - I stumbled upon some challenges and I thought I’d document them for other PyCharm users who might benefit from this blog entry.

Let’s get right into the issue:

My Setup:

I have a Windows 7 host where I do most of my development. I develop software for a Linux based system and most of the Python libraries that I need to work from third-party vendors are only available for Linux. And so my PyCharm IDE runs on Windows and I have a VirtualBox instance of CentOS linux running within my host machine accessible via a Virtual Box - Bridged Adapter. This Linux could also be running in a separate physical host accessible via TCP-IP. Now that we have a good idea about my development environment, let’s go over why I want to use the “remote interpreters” feature.

Remote Interpreters

This feature allows you to connect with a Python environment and all’s of it’s SITE_PACKAGES available on the remote machine as if you were running it locally on your native PC. Furthermore, you can perform step-through of your code right from your development platform as if you ran the IDE right within the Linux machine. (Please note that this feature can then lend itself to running the Linux server as a terminal without a GUI/Windows Manager like KDE/Gnome). This will simplify your footprint on the server side.

Challenges

When you run the interpreter, you will run into issues such as “No such file or directory.” That’s because when you execute a file natively in Windows under c:\temp\abc.py - the “remote interpreter” is now looking for a file under that same path in the remote server under Linux. To avoid this issue, here’s the solution I have engaged.

  1. Share my c:\projects\MyProject to myself so that I can map a new drive under Windows such as “K:\MyProjects”.
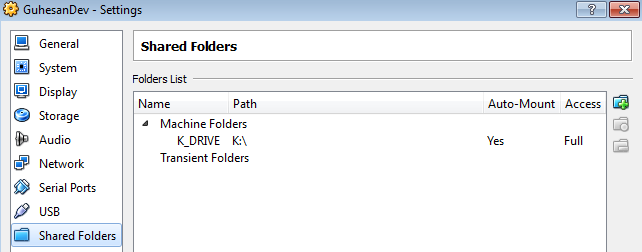
  2. Shared a “Machine Folder” to my Virtual machine. If you have a remote host, then either setup a GIT push scheme or a SFTP from your Windows to this remote server. See image below for illustration.
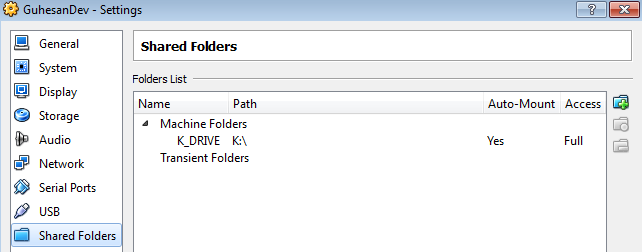
    Virtual Box - Machine Target
  3. At this time, My “c:\projects” folder is shared to the Linux environment as “/media/sf_K_DRIVE/” and “auto-mounted”. (I have also added my user-id to the “vboxsf” group because of permissions. But that’s another blog…)
  4. Now every modification of my Python files in my “K:\MyProject”, is exactly the same on the Linux virtual-box.
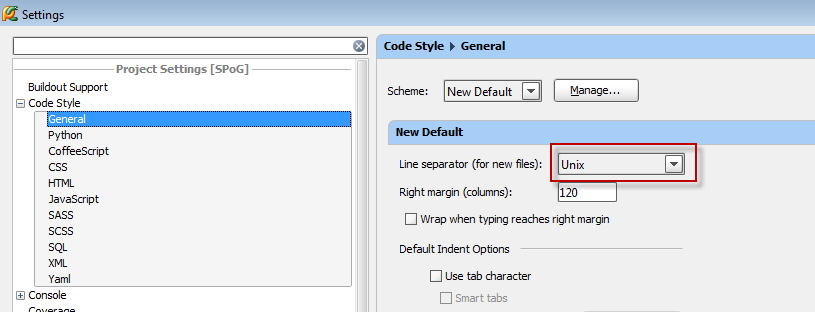
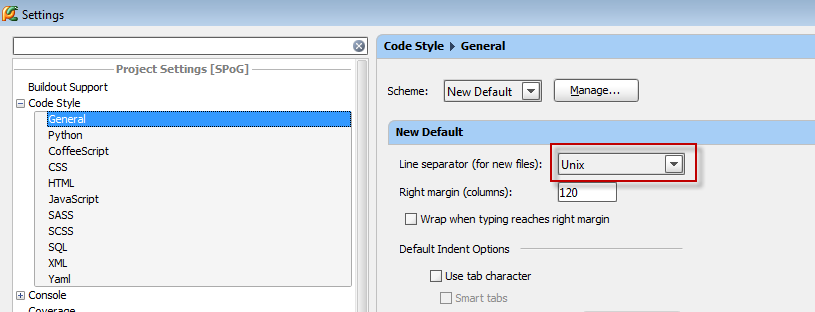
  5. The first setting to change is the “Line Seperator” (unless you want to execute Dos2Unix each time you run the file on Linux). This can be done under “Code Style” in PyCharm Settings. See image below:PyCharm Settings Line Seperator
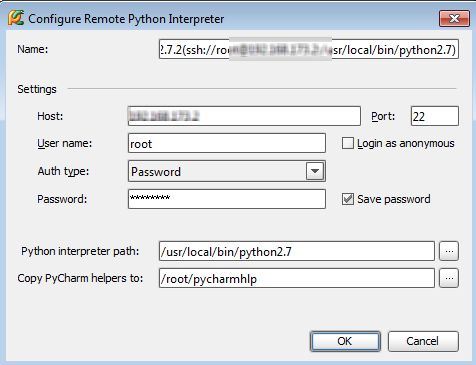
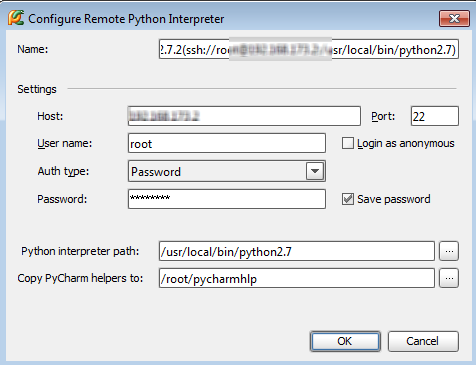
  6. Next, configure the “Remote Python Interpreter”. See screenshot below:PyCharm - Configure Remote Interpreter
  7. In the previous step, when you choose a path on the Linux server for the “PyCharm helpers”, PyCharm pushes via SSH a set of libraries and software that helps with the remote debugging and scaffolding.
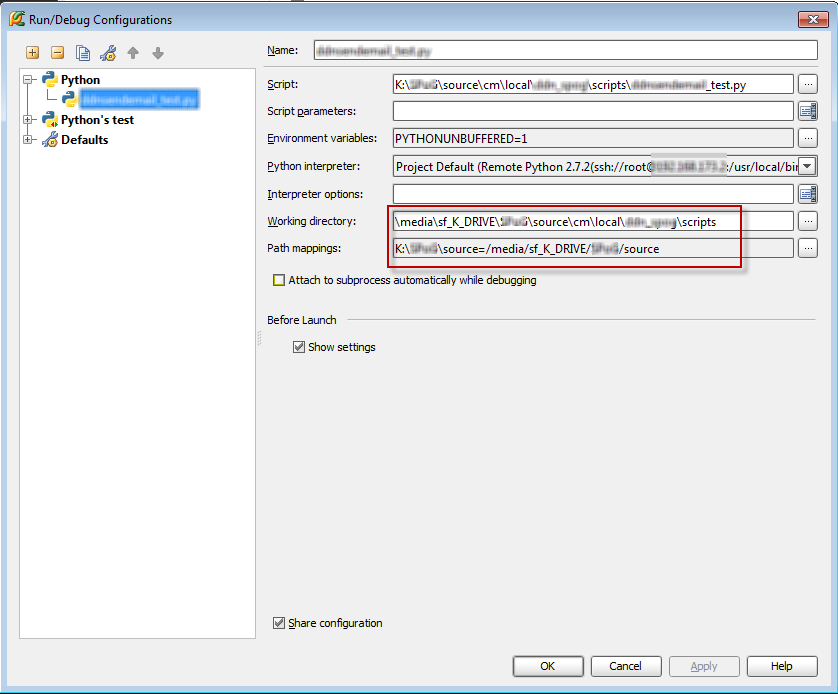
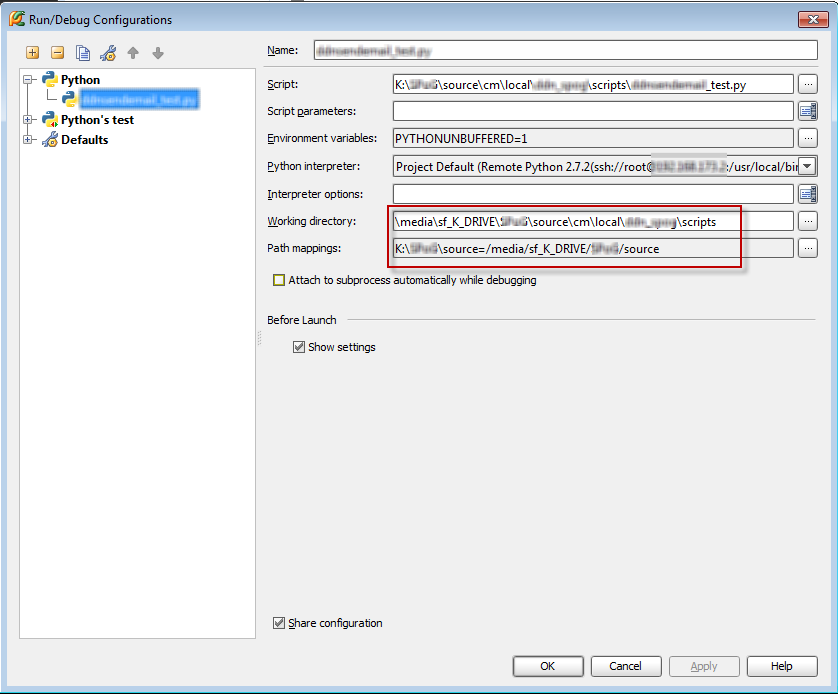
  8. The next step is to Run (or Debug) your code. See the screenshot below that shows the details of the “Run/Debug Configuration” screen. The important parts are “Working Directory” and “Path Mappings”. This is the trick that allows you to map your Windows Path to an equivalent Linux Path.PyCharm - Run/Debug Configuration Screen
  9. Now run (or debug) away your code as if it was running locally on your native Windows development platform.
That should get the job done.

Update on May 18th, 2012

#This shows you an example of how you would invoke a Python UnitTest via remote-interpreter to another script located in the same folder.

#Invoked from sendfoo_test.py
scriptName = "sendfoo.py"
# BASE_PATH is the absolute path of ../.. relative to this script location
BASE_PATH = reduce(lambda l,r: l + os.path.sep + r, os.path.dirname( os.path.realpath( __file__ ) ).split( os.path.sep ) )
#print BASE_PATH
# add ../../scripts (relative to the file (!) and not to the CWD)
NEWSCRIPTPATH = os.path.join( BASE_PATH, scriptName )
#print NEWSCRIPTPATH
#Further down in code…
p1 = os.popen("%s" % self.NEWSCRIPTPATH, "w")
p1.close()

For early Pythons…

#If you are using Python 2.6.6 (not Python 2.7+)
scriptLocation = "sendfoo.py"
scriptLocation = os.path.join( os.path.dirname( os.path.realpath( __file__ ) ), scriptLocation )
print scriptLocation
#Further down in code…
p1 = os.popen("%s" % self.NEWSCRIPTPATH, "w")
p1.close()
Posted in Programming, PyCharm, Python, Technology | Tagged: , , , , , , , , , , , , | 6 Comments »

How to extract public key from certificate?

Posted by Venkatt Guhesan on February 15, 2011

How to extract public key from certificate?

Recently I had to extract the public key from a certificate. Each time I do this I end up looking up the man pages for openssl and so I thought I’d blog it for myself and for others to use when needed.

$ openssl x509 -inform pem -in certificate.pem -pubkey -noout > publickey.pem

Enjoy

Posted in Programming, Uncategorized | 3 Comments »

Extract all images in PDF file in a directory (batch extract images)

Posted by Venkatt Guhesan on November 28, 2010

Sometimes you need a way to extract all images in a PDF but then you have a directory of files and you need to extract them iteratively.

Prerequisites:

1. Install Cygwin or linux environment with Perl support.

2. Install ImageMagick.

3. Install GhostScript.

Afterward run the following script:

#!/bin/perl
my $directory = $ARGV[0];
opendir (DIR, $directory) or die $!;
while (my $file = readdir(DIR))
{
if ($file =~ m/\.pdf/)
{
my $newfile = $file;
$newfile =~ s/\.pdf/_%01d\.jpg/;
print "Processing " . $file . " ; newfilename: " . $newfile . "...\n";
`convert -density 150 $file $newfile`;
}
}

How to invoke:
scriptname path_to_pdf_files

Cheers.

Posted in Programming | Tagged: , , | Leave a Comment »

GreaseMonkey to the rescue - fixing Apache Jackrabbit Site

Posted by Venkatt Guhesan on April 21, 2010

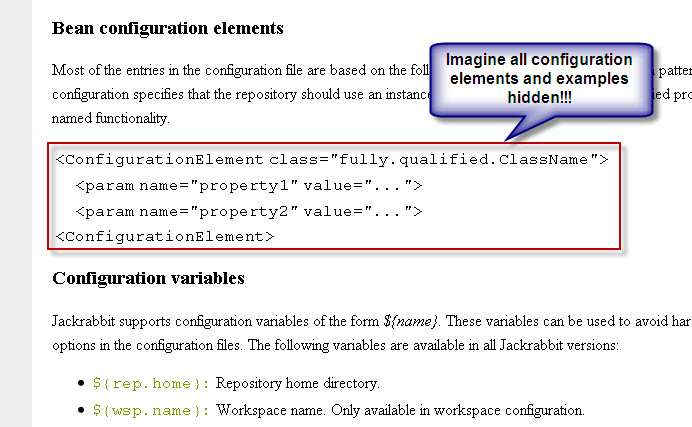
Starting yesterday the Apache JackRabbit JCR website had an interesting problem. Someone must have made a change to the base template such that they had removed the SyntaxHighlighter code that needs to be appended to the header. I’ve opened an issue in their jira issue tracker.

>>>>>>>> Contents of JIRA Issue >>>>>>>>
It started happening today. When I visit the website, for example:
http://jackrabbit.apache.org/node-type-notation.html

All the artifacts that contain a “SCRIPT” of type syntaxhighlighter does not get displayed.

So basically all examples on the site fails to show up.

Example:
Upon view-source, you will find artifacts like this:

<code>
<script class="toolbar: false; theme: default; brush: java; gutter: false" type="syntaxhighlighter">// <![CDATA[
 public class FirstHop { // Some Code... }
// ]]></script>
</code>

None of the artifacts that are using “syntaxhighlighter” gets displayed. Which leaves the site almost useless when it comes to documentation.

Problem must have started today (April 19, 2010) since I was able to see them last night.
>>>>>>>> Contents of JIRA Issue >>>>>>>>

But while I wait for a fix the site is pretty much unusable. Let me show you an example,

So essentially you have a website that has no examples, no configuration details, etc. While I wait for a fix (which can happen any day), I thought this is a good opportunity to whip out a Greasemonkey Script to fix the issue. So this article focuses on creating a GreaseMonkey script that addresses this issue in my browser while the site is broken.

Let’s first look at the problem:

Apache Jackrabbit site needs to include the following in their header tag:

<link href='http://alexgorbatchev.com/pub/sh/current/styles/shCore.css' rel='stylesheet' type='text/css'/>
<link href='http://alexgorbatchev.com/pub/sh/current/styles/shThemeDefault.css' rel='stylesheet' type='text/css'/>
<script src='http://alexgorbatchev.com/pub/sh/current/scripts/shCore.js' type='text/javascript'></script>
<script src='http://alexgorbatchev.com/pub/sh/current/scripts/shBrushJava.js' type='text/javascript'></script>
<script src='http://alexgorbatchev.com/pub/sh/current/scripts/shBrushXml.js' type='text/javascript'></script>
<script language='javascript'>
SyntaxHighlighter.config.bloggerMode = true;
SyntaxHighlighter.config.clipboardSwf = 'http://alexgorbatchev.com/pub/sh/current/scripts/clipboard.swf';
SyntaxHighlighter.all();
</script>

Using GreaseMonkey, you can insert any script at any point in the document or site (from the browsers perspective). So here’s the script that does that:

// ==UserScript==
// @name           Apache JackRabbit Script
// @namespace      jackrabbit.apache.org
// @description    fixes the SyntaxHighlighter
// @include        http://jackrabbit.apache.org/*
// ==/UserScript==
function addHeaderForSyntaxHighlighter(){
	var addStyle1 = document.createElement('style');
	addStyle1.type = 'text/css';
	addStyle1.link = 'http://alexgorbatchev.com/pub/sh/current/styles/shCore.css';
	var addStyle2 = document.createElement('style');
	addStyle2.type = 'text/css';
	addStyle2.link = 'http://alexgorbatchev.com/pub/sh/current/styles/shThemeDefault.css';
	var addScript1 = document.createElement('script');
	addScript1.type = 'text/javascript';
	addScript1.src = 'http://alexgorbatchev.com/pub/sh/current/scripts/shCore.js';
	var addScript2 = document.createElement('script');
	addScript2.type = 'text/javascript';
	addScript2.src = 'http://alexgorbatchev.com/pub/sh/current/scripts/shBrushJava.js';
	var addScript3 = document.createElement('script');
	addScript3.type = 'text/javascript';
	addScript3.src = 'http://alexgorbatchev.com/pub/sh/current/scripts/shBrushXml.js';
	var addBaseScript = document.createElement('script');
	addBaseScript.type = 'text/javascript';
	addBaseScript.src = 'http://www.avedatech.com/js/fixForJackRabbitSyntaxHighlighter.js';
	var headID = document.getElementsByTagName("head")[0];
	headID.appendChild(addStyle1);
	headID.appendChild(addStyle2);
	headID.appendChild(addScript1);
	headID.appendChild(addScript2);
	headID.appendChild(addScript3);
	headID.appendChild(addBaseScript);
}
addHeaderForSyntaxHighlighter();

The above greesemonkey script adds the styles and necessary javascript to the page so that all the artifacts that use the SyntaxHighlighter are displayed. I’m attaching the file here for anyone who wants to use it in their greesemonkey script in FireFox.

Greesemonkey JackRabbit Site Fix Script

If you have GreeseMonkey installed in your FireFox browser, you can then click on the above link and GreeseMonkey will prompt you to approve the installation of the script. So you don’t need to do anything fancy. And you can uninstall it at anytime.

PS: If you are someone (or if you know of someone) who manages the Apache JackRabbit website, please fix the SyntaxHighlighter issue. We need the documentation! Thank You.

Cheers.

>>>>>>>>>>>>>>>

UPDATE from Sébastien Launay on Thurs., April 22, 2010 - Thank you for the information. Helps to know that someone out there is aware of the issue.

Hi Venkatt,

Thanks for reporting this issue.

The bug appears to be global to Apache projects websites and related
to the confluence auto-export feature:
https://issues.apache.org/jira/browse/INFRA-2638


Sébastien Launay

>>>>>>>>>>>>>>>>>>>>>

Update - on Friday, April 23rd, 2010 - this bug has been resolved and verified. So no need for the patch with Grease Monkey.


Posted in GreaseMonkey, JackRabbit | Tagged: , , , | 4 Comments »

Spring Framework Samples and Reference Implementations online in svn

Posted by Venkatt Guhesan on April 19, 2010

Sometimes it’s good to look at the svn repository for the reference sample that Spring Framework provides.

Here’s a quick link for that URL:

https://src.springframework.org/svn/spring-samples/

You can traverse through it via a HTTP(s) browser or you can download the latest samples via tools like TortiseSVN.

Here is a list of some of the projects samples that are available today:

spring-samples - Revision 431: /

* configuration-basic/
* jpetstore/
* mvc-ajax/
* mvc-basic/
* petcare/
* petclinic/
* petclinic-groovy/
* spring-travel/
* task-basic/
* templates/
* tutorials/

Hopefully this article will be beneficial for someone who is trying to get familiar with Spring Framework.

Cheers.

Posted in Java, Programming, Spring, Spring Framework | Tagged: , , | Leave a Comment »

Java 6 Gems: Spash Screen for your application

Posted by Venkatt Guhesan on April 12, 2010

In my coverage of all the new features that are part of Java SE 6, there is a new gem added that makes the user experience very clean and concise when you bring up a web-start or applet or desktop based Java application. Namely, the splash screen.

When you load up a native application, it’s very traditional to display a “splash screen” with the company logo and branding of the particular product. In the past, you had to write your own loader class that did this. But now Java has added support for it. Class - java.awt.SplashScreen does the job for you.

The splash screen is displayed as an undecorated window containing an image. You can use GIF, JPEG, and PNG files for the image. Animation (for GIF) and transparency (for GIF, PNG) are supported. The window is positioned at the center of the screen (the position on multi-monitor systems is not specified - it is platform and implementation dependent). The window is closed automatically as soon as the first window is displayed by Swing/AWT

- excerpt from the Java SplashScreen API

There are two ways to invoke the splash screen:

java -splash:filename.png MyApplication

or add it within your manifest.mf file like this

Manifest-Version: 1.0
Main-Class: Test
SplashScreen-Image: filename.png

Now you have a common, concise way to display the splash screen. And if your application does anything like reloading classes or has a built in feature to restart certain parts of the application. You can even get the latest from a remote URL. Since it exposes, the following API [ setImageURL(URL imageURL) ], you can programatically invoke a URL like this on the server-side:

http://www.myapplication.com/getVersion.jsp?ver=1.2.3

And this can return a binary stream of “content-type: image/png”. But on the back-end you can tally the number of folks using version 1.2.3, etc.

Cheers.

If you find this article useful, consider signing up for my RSS feed or Email Newsletter. See links on the right side.

Posted in Java, Programming | Leave a Comment »

Finding the balance for your open source skills with .NET

Posted by Venkatt Guhesan on April 8, 2010

I have been a strong supporter of Open Source technologies including Java, Python, Scala, Ruby and Perl for many, many years. But in order to be a strong Enterprise Architect, it’s best to also understand the various other technologies (some proprietary) to gain a broader-balanced view of technology and whats out there. And in this ever changing world of technology - knowing the various options you have can make the difference between being nimble and creative to an implementation that bites the dust. So today let’s explore some options you have with learning and getting on board with the .NET technology.

The first and foremost option that comes to everyone’s mind is to buy (or download the 90-day trial version) of Microsoft Visual Studio. But did you know that there are some other “free” options that are available to get you started?

Yes, I said - “free” and Microsoft in the same paragraph. Surprisingly, in order to compete with all the open source options available out there, especially with Java, PHP, Ruby, etc, Microsoft is giving away their base development products for free. They are called Express Editions. Well, before we look at the options of Express Editions, let’s take a short trip on what exactly is .NET.

With the introduction of the “.NET” framework, Microsoft has gotten on the Java wagon (where a compiled byte code runs on a Java Runtime Engine instead of running natively as an executable). And in Microsoft’s case the compiled code runs on a “Common Language Runtime” layer (CLR). So with this advantage, now a Microsoft developer can develop code in their favorite language of their choice - C++.NET (pronounced C-plus-plus), C#.NET (pronounced C-sharp), or VB.NET (Visual Basic) or Silverlight or ASP.NET (using the Visual Web Developer) and have the compiled code run in the CLR layer regardless of the source. This makes your development language agnostic. Write code in the language that you are most comfortable with and run it on the .NET platform. But now you need a common set of API’s to drive this .NET engine. And hence the “unified programming classes and API’s”. By creating a common set of API’s across all programming languages, the common language run-time enables cross-language inheritance, error handling, and debugging. But keep in mind that this allows you to run your code where the .NET run-time platform is available. And at present, Microsoft has only made this framework available on Windows and Windows compatible operating systems. Which means - no Linux.

But help is on the way with an open source project called Mono. The folks at Mono have implemented the run-time engine and .NET specification for other platforms and as I write this, there is support for this run-time in Linux and other OS’s (Mono runs on Linux, Microsoft Windows, Mac OS X, BSD, and Sun Solaris, Nintendo Wii, Sony PlayStation 3, Apple iPhone. - taken from Mono’s project site). But what this means is that you need to use Mono’s API instead of the “unified programming classes and API’s”. So depending on your goal, it may be better to use the Mono API instead of Microsoft’s API. And also if you plan on using Mono, then make sure you are thinking in C# (c sharp) because that’s the language that’s currently supported.

Now that we have a good understanding of our options, let’s look at tools we can use, depending on the language you decide to learn:

Visual Basic 2008 Express Edition

Visual C# 2008 Express Edition

Visual C++ 2008 Express Edition

Visual Web Developer 2008 Express Edition

And when you install the first three, you also get the option to install SQL Server lite version as well. And if you are developing for SilverLight, you want to use the Visual Web Developer Express Edition.

To begin your learning in the .NET technology, one of the sites I have always found very helpful is RampUp from Microsoft. Below is a link to the RampUp website:

RampUp : http://msdn.microsoft.com/en-us/rampup/default.aspx

So if .NET is your flavor of the month or if you are trying to learn a new language, give .NET a try. You may find greener pastures on the other side.

;-)

Cheers.

If you find this article useful, consider signing up for my RSS feed or Email Newsletter. See links on the right side.

Posted in .NET, Programming | Leave a Comment »

Java 6 Gems: Scripting Framework to support Rhino Javascript and Groovy (natively)

Posted by Venkatt Guhesan on April 6, 2010

What is it? With Java 6 there is a new addition (package: javax.script) that allows you to work with scripting languages like Javascript (using Rhino) and Groovy. Although there is built in support for adding scripting engines like Groovy, PHP, Perl, etc - what’s bundled in this release is Mozilla’s Rhino Javascript Engine.

Why embed a scripting language? Most scripting languages out there are dynamically typed. Meaning, your code does not need to know what type of value you will be storing in a particular field at compile time. So for example, using JavaScript as a scripting language, you can store “John” [var name = “John”;] or the numerical value of five (5) [var name = 5;] in a var. And since the variables are loosely typed, the language takes care of storing the data by guessing at what’s being stored in that variable. Well why does this benefit us? Well, these technologies help us in prototyping quick, build applications faster, and for situations where you can execute commands repeatedly as well as in tying different technologies together. Developers usually agree that for processing\parsing, Perl has always had an upper hand. So imaging using the perl scripting engine to develop an application that can parse a file efficiently. The other situation where embedding a scripting language comes in handy is - when you are developing a Java FX or Java Swing based application. Now you can develop libraries that can work seamlessly whether they are deployed on a FireFox browser or on a custom Java application on your smart-phone. The third arena where this makes sense is in server-side processing. Imaging a back-end application that needs to perform some text manipulation. You can tie a perl or sed or awk script engine on the back-end via a command shell like bash or ksh to perform the operations right within the Java application and all along work with variables right in the Java memory space.

Simple Example: Let’s take a look at an example, where we print the string “Hello World” onto the System.out.

ScriptEngineManager mgr = new ScriptEngineManager();
ScriptEngine jsEngine = mgr.getEngineByExtension("js");
try {
jsEngine.eval("print('Hello, world!')");
} catch (ScriptException ex) {
ex.printStackTrace();
}

Well, your first thought will be that I could have done this in one Java line [ System.out.println(“Hello World”); ] but the point here to see the profound impact that this option can bring to the Java language.

Now let’s look at a way to access a variable in the Java space:

String name = "John";
ScriptEngineManager mgr = new ScriptEngineManager();
ScriptEngine jsEngine = mgr.getEngineByExtension("js");
try {
jsEngine.put("jsname", name);
jsEngine.eval("print('My name is ' + jsname)");
} catch (ScriptException ex) {
ex.printStackTrace();
}

Well you can learn to use this technology with relevant examples here. Interested in learning more about this technology and how it impacts Java, then look at JSR 223. Now almost every web developer using Java has at one point of time explored Groovy. In the past, you would run your Groovy code using an interpreter available when you download Groovy. But now using this technology, you can embed Groovy into the JVM such that you have access to data and variables in both namespaces. To cover the basis for using Groovy natively is beyond today’s blog but you can see the possibilities of what you can do here.

Here is a list of available Scripting Engines that you can drop into Java including support for Awk, Freemarker, Groovy, Javascript (using Rhino), Python, Ruby, Tcl, PHP, Smalltalk, etc. As I’m writing this blog, the jsr223-engines.zip contains the following scripting languages:

browserjs, ejs, freemarker, groovy, jacl, jaskell, java, javascript, jawk, jelly, jep, jexl, jruby, jst, judo, juel, jython, ognl, pnuts, scheme, velocity, xpath, xslt.

So if you need to prototype fast and don’t want to run an separate instance of Apache server with mod_php or mod_python to develop using these scripting languages. Now you can do this all within Tomcat or in native Java with a few simple drop-in JAR’s.

Happy Scripting!!!

If you find this article useful, consider signing up for my RSS feed or Email Newsletter. See links on the right side.

Posted in Java, Programming | Leave a Comment »

Speeding up your load time for your Java applets and webstart applications

Posted by Venkatt Guhesan on March 31, 2010

Today we are going to look at a new feature available in Java 5 and above that can speed up your load time of your jar’s within your applets and web start (provided you have a web server that’s hosting the jar that’s HTTP/1.1 compatible server).

Let’s first take a look at what happens on the back-end:

In a typical applet (same applies to a web-start application), you have a src/source tag that points to a JAR file like this:

<applet CODE = "com.MyApplet.class" ARCHIVE = "/archive/MyAppletArchive.jar">
</applet>

Here your browser requests a JAR containing the needed class files under “/archive/”. If the web server finds the JAR, it sends it back to the requesting code.

Well in Java 5 and above, they have a new compression scheme called “Pack200” - see (java.util.jar.Pack200) that allows you to send an alternative file that has it’s content compressed further using Pack200 format. The file’s can usually be reduced by 1/8th the original deflated jar file.

So when the browser requests the server for that JAR file, in the request header it will send all the formats that it can accept, namely -

Accept-Encoding=pack200-gzip, gzip

This tells the server that if you have a pack200-gzip then send that but in the case you do not, then send me the gzip-ed version of the JAR file.

So the next step in making this magic trick work is to modify the ARCHIVE tag to a servlet instead of a resource request. So now your ARCHIVE tag looks like this:

ARCHIVE = "/archive/MyJARServlet.do?file=MyAppletArchive.jar"

And in your MyJARServlet, you can scan on the file-system first for a”MyAppletArchive.pack.jar.gz” file and send it and in the case that the request does not have a Accept_Encoding of “pack200-gzip” then your code can default to sending in the plain-old “gzip” JAR file.

To see a sample of how this work, see the following URL:
http://java.sun.com/j2se/1.5.0/docs/guide/deployment/deployment-guide/pack200.html

Now the next question one would ask is “How do I pack it using Pack200 format?”

Simple, within the JRE/bin or JDK/bin directory of Java 5 or later, you will find a utility called “pack200.exe” (windows). You can take an existing JAR file and pack it into that format by using the following command:

JRE/bin>pack200 myjarfile.jar

By using this strategy, you can decrease the time it takes to send that file. Smaller file = less time to send and less bandwidth that’s used. If you plan on implementing this, bear in mind that there is a little bit of overhead to unpacking a Pack200 or compressed-gzip file as opposed to a JAR-ed non-compressed file. So you decide which approach makes sense.

Cheers.

If you find this article useful, consider signing up for my RSS feed or Email Newsletter. See links on the right side.

Posted in Java, Programming | Leave a Comment »

Spring 3.0 - Application Context - three ways to get the context

Posted by Venkatt Guhesan on March 22, 2010

In searching Google for “Spring ApplicationContextAware“, you come across a lot of recommendations and I also see a lot of folks continuing to complain saying that their setApplicationContext method does not get invoked. So to help clarify, I’m blogging a few notes in hope that it helps clarify a few things.

Two Ways to Get Application Context:

Method #1: In your class you implement ApplicationContextAware class like this:

public class MyClass implements ApplicationContextAware {
    static final long serialVersionUID = 02L;
    ApplicationContext applicationContext = null;
    public void doSomething(){
        if (applicationContext != null && applicationContext.containsBean("accessKeys")){
            MyBean beanA = (MyBean) applicationContext.getBean("mybean");
            //Do something with this AccessBean
        }
        return null;
    }
    @Override
    public void setApplicationContext(final ApplicationContext applicationContext) throws BeansException {
        System.out.println("setting context");
        this.applicationContext = applicationContext;
    }
}

Method #2: If you are in a Java Servlet, you can do the following:

public class gzservlet extends HttpServlet {
    static final long serialVersionUID = 02L;
    ApplicationContext applicationContext = null;
    @Override
    protected void doGet(HttpServletRequest req, HttpServletResponse resp) throws ServletException, IOException {
        if (applicationContext == null){
            System.out.println("setting context in get");
            applicationContext = WebApplicationContextUtils.getWebApplicationContext(this.getServletContext());
        }
        if (applicationContext != null && applicationContext.containsBean("accessKeys")){
            AccessBean thisAccessBean = (AccessBean) applicationContext.getBean("accessKeys");
            req.setAttribute("keys", thisAccessBean.toString());
            System.out.println("setting keys");
        }
        req.getRequestDispatcher("/index2.jsp").include(req,resp);
    }
}

So the question one would ask is when to use what? And the answer is. Depends on how you are invoking Spring.

What works for Method #1: when you invoke Spring you are using the DispatcherServlet link this. Then Method #1 will resolve the implementation of ApplicationContextAware and call the setApplicationContext() method to set the context.

In web.xml.
<servlet>
	<servlet-name>dispatchservlet</servlet-name>
	<servlet-class>org.springframework.web.servlet.DispatcherServlet</servlet-class>
	<load-on-startup>1</load-on-startup>
</servlet>
<servlet-mapping>
	<servlet-name>dispatchservlet</servlet-name>
	<url-pattern>/*</url-pattern>
</servlet-mapping>

If you are not using the DispatcherServlet and you are initializing Spring using a Listener and you have your own Servlet that’s driving the Request\Response scope then use Method #2. Below is an example of how the web.xml will look like in this case.

<listener>
   <listener-class>org.springframework.web.context.ContextLoaderListener</listener-class>
</listener>
<servlet>
  <servlet-name>MyOwnServlet</servlet-name>
  <servlet-class>com.something.myservlet</servlet-class>
  <load-on-startup>2</load-on-startup>
</servlet>
<servlet-mapping>
  <servlet-name>MyOwnServlet</servlet-name>
  <url-pattern>*.do</url-pattern>
</servlet-mapping>

I hope this clarifies why sometimes even though you have implemented the ApplicationContextAware interface, your setter does not get invoked.

[09/12/2010] Here is a third way to get your context:

Create the following class with a static method to get your context:

import org.springframework.beans.BeansException;
import org.springframework.context.ApplicationContext;
import org.springframework.context.ApplicationContextAware;
public class ApplicationContextProvider implements ApplicationContextAware{
 private static ApplicationContext ctx = null;
 public static ApplicationContext getApplicationContext() {
return ctx;
 }
 public void setApplicationContext(ApplicationContext ctx) throws BeansException {
this.ctx = ctx;
 }
}

and in your spring bean configuration xml file add the following:

<bean id="applicationContextProvider" class="ApplicationContextProvider"></bean>

And now in your classes, you can do the following:

ApplicationContext ctx = ApplicationContextProvider.getApplicationContext();

That’s it!!!

Cheers.

If you find this article useful, consider signing up for my RSS feed or Email Newsletter. See links on the right side.

Posted in Programming, Spring | 29 Comments »

 
Follow

Get every new post delivered to your Inbox.

Join 149 other followers